The Best Fluffy Pancakes recipe you will fall in love with. Full of tips and tricks to help you make the best pancakes.

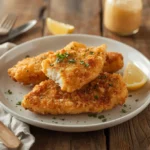
Fried chicken thighs recipe is a classic comfort food that delivers perfectly crispy skin and juicy, tender meat every time. This detailed guide will show you how to achieve restaurant-quality results using simple ingredients and proven techniques that ensure success.
While some recipes rush the process, we’ll cover the essential steps that make the difference between mediocre and magnificent fried chicken. From proper seasoning to maintaining the right oil temperature, you’ll learn all the secrets to creating irresistibly crunchy, flavorful chicken thighs.
Prep Time: 30 minutes (plus 4 hours marinating)
Cook Time: 25-30 minutes
Total Time: 5 hours
Yield: 6-8 servings (8-10 chicken thighs)
Contents
hide
Ingredients

- 8-10 bone-in, skin-on chicken thighs
- 2 cups buttermilk
- 3 cups all-purpose flour
- 1 tablespoon paprika
- 2 teaspoons garlic powder
- 2 teaspoons onion powder
- 1 tablespoon kosher salt
- 2 teaspoons black pepper
- 1/2 teaspoon cayenne pepper (optional)
- 2 large eggs
- 1/4 cup hot sauce
- Vegetable oil for frying
Choose chicken thighs that are similar in size for even cooking. Farm-fresh or organic chicken thighs often provide superior flavor and texture, though regular supermarket varieties work well too.
For the flour coating, all-purpose flour creates the ideal crispy exterior. While self-rising flour can be substituted, it may result in a slightly different texture.
Real buttermilk is crucial for tenderizing the meat – avoid using milk with vinegar as a substitute, as it won’t provide the same results. If you must substitute, use plain yogurt thinned with a little milk instead.
The hot sauce adds flavor without making the chicken spicy. Feel free to adjust the amount or omit it entirely based on your preferences.
Fried Chicken Thighs Recipe: Step-by-Step Instructions

Before beginning, ensure all ingredients are at room temperature for even cooking.
- Combine buttermilk, hot sauce, 1 teaspoon salt, and 1 teaspoon black pepper in a large bowl
- Submerge chicken thighs in the buttermilk mixture, cover, and refrigerate for 4-12 hours
- Mix flour and remaining seasonings in a Shallow Dishes For Dredging
- Whisk eggs in a separate bowl
- Remove chicken from buttermilk, letting excess drip off
- Dredge each piece in seasoned flour, shaking off excess
- Dip in beaten egg mixture
- Coat again in flour mixture, pressing gently to adhere
- Heat oil to 350°F in a large, heavy-bottomed pot or deep skillet
- Carefully place chicken thighs in hot oil, skin side down
- Fry for 12-15 minutes, turning halfway through, until golden brown
- Check internal temperature reaches 165°F at the thickest part
(You can find out more via fried chicken thighs recipe).
Watch the oil temperature carefully – if it drops below 325°F, the coating will become greasy. If it exceeds 375°F, the exterior will burn before the inside cooks through.
You’ll know the chicken is nearly done when the bubbling around each piece becomes less vigorous. If the coating browns too quickly, lower the heat slightly.
(You can find out more via fried chicken thighs recipe).
Don’t crowd the pan – leave at least an inch of space between pieces. Work in batches if necessary to maintain proper oil temperature.
Tips for Perfect Results
- Pat chicken thighs completely dry before marinating
- Bring chicken to room temperature before frying
- Use a Deep-fry Thermometer for precise temperature control
- Let the coated chicken rest 10 minutes before frying
- Maintain oil temperature between 325-350°F
- Don’t flip the chicken more than once
- Rest fried pieces on a wire rack, not paper towels
- Season immediately after removing from oil
- Check oil temperature between batches
- Allow 5-10 minutes resting time before serving
The most common mistake is rushing the process. Give each piece adequate time to develop a golden crust. If the coating starts to darken too quickly, your oil is too hot.
For extra-crispy results, double-dredge the chicken by repeating the flour-egg-flour coating process. Just remember this will create a thicker crust that requires slightly longer cooking time.
Serving Suggestions
These crispy fried chicken thighs pair beautifully with classic Southern sides. Serve alongside creamy mashed potatoes and gravy for a traditional combination that never disappoints.
For a lighter option, accompany with a crisp coleslaw or fresh green salad. The cool, crunchy vegetables provide a perfect contrast to the hot, crispy chicken.
Don’t forget the traditional accompaniments like honey butter biscuits, corn on the cob, or mac and cheese. A drizzle of hot honey adds a modern twist to this classic dish.
For a complete feast, include some pickled vegetables or tangy cucumber salad to cut through the richness of the fried chicken.
Storage & Reheating
Allow leftover fried chicken thighs to cool completely before storing. Place in an airtight container and refrigerate for up to 3 days.
For best results, reheat in a 375°F oven for 15-20 minutes until heated through. Avoid the microwave, which will make the coating soggy.
If you need to make ahead, you can prepare the coating and marinate the chicken up to 24 hours in advance. However, for optimal crispiness, fry just before serving.
While freezing is possible, the texture of the coating may change slightly upon thawing. If you must freeze, wrap individual pieces tightly and use within 2 months.
Variations
Crispy Pan Fried Chicken Thighs
For a less oil-intensive version, pan-fry the chicken thighs in a cast-iron skillet with about 1/2 inch of oil. This method requires careful temperature control and slightly longer cooking time.
Start skin-side down and cook for 8-10 minutes before flipping. The results are equally delicious with a wonderfully crispy skin.
Oven Fried Chicken Thighs with Extra Crunch
Achieve crispy results by baking at 425°F on a preheated baking sheet. Spray the coated chicken with oil before baking for 35-40 minutes, flipping halfway through. (Read also: The Ultimate Guide to Crispy Chicken Skin)
While different from traditional frying, this method produces deliciously crispy chicken with less mess and oil.
Spicy Buttermilk Fried Chicken
Double the cayenne pepper and add 1 tablespoon of hot paprika to the flour mixture. You can also increase the hot sauce in the marinade for more heat.
Serve with cooling ranch dressing or blue cheese sauce to balance the spiciness.
How to Make Crispy Chicken Thighs with Herbs
Add fresh herbs like thyme, rosemary, and sage to the flour mixture. You can also infuse the oil with herbs before frying for additional flavor.
This variation works particularly well when serving the chicken at room temperature for picnics or parties.
FAQ
Why isn’t my chicken skin getting crispy?
The most common causes are oil temperature too low, coating too wet, or overcrowding the pan. Use a thermometer to maintain 350°F and fry in batches if needed.
Can I use skinless chicken thighs?
Yes, though the result will be slightly less crispy. Reduce cooking time by 2-3 minutes and watch carefully to prevent drying.
Why did my coating fall off?
This usually happens if the chicken is too wet or the oil isn’t hot enough. Ensure chicken is well-drained and flour coating is firmly pressed on before frying.
How do I know when the oil is ready?
Use a deep-fry thermometer for accuracy. If you don’t have one, drop a small piece of coating in – it should sizzle and rise to the surface immediately.
Can I reuse the frying oil?
Yes, strain cooled oil through a fine-mesh sieve and store in an airtight container. Reuse up to 3 times before discarding, as long as it hasn’t burned.
Why is my chicken oily?
Oil-saturated coating usually means the oil temperature was too low. Maintain 350°F and drain finished pieces on a wire rack, not paper towels.
Can I marinate longer than 12 hours?
While possible, marinating beyond 12 hours can make the meat too soft. Stick to 4-12 hours for best texture.
What’s the best oil for frying chicken?
Vegetable oil, peanut oil, or canola oil are ideal due to their high smoke points and neutral flavors.
Kitchen Tools You’ll Need
- Large Heavy-bottomed Pot Or Deep Skillet
- Deep-fry Thermometer
- Wire Cooling Rack
- Large Mixing Bowls
- Shallow Dishes For Dredging
- Tongs
- Spider Strainer
- Meat Thermometer
More Recipes You May Like


The Ultimate Marinades & Rubs Guide
To receive the book for free, please send the following information via email.
Newsletter Frequency